It’s that time of year again, though it may not quite feel it. The leaves have taken their time falling from the trees, department stores are playing “Happy Holidays” on a loop to almost entirely empty rooms, and I’m wearing a big pink hat I bought on Etsy last month because it makes not leaving my house feel slightly more festive.
To celebrate, Shortcut is highlighting twelve of our integrations with a detailed write up alongside their own little digital snow globes. We hope you return every day to enjoy these posts alongside your tinglers and fuzzles, your dafflers and wuzzles, and your delicious pot (or Beyond meat) roasts
Our twelve featured integration is not an integration but instead a way for you to build your own. The Shortcut API.
On our Twelfth Day of Integrations Shortcut gives to you: A REST API in a Shortcut. You really need to sing that line to make it work.
Why stop stop at using integrations that other organizations have built, when you can also build your own?
The Shortcut API provides a greater amount of control over your Shortcut data than what is possible in the web app alone. You can use the API to build custom integrations or automate more of your workflow.
You can read detailed documentation about our API right here.
In some cases you're even able to take one of our existing integrations and build a personal version that's even better. That's what one of our customers, Elizabeth Toy from Gloo, did for our Zendesk integration. It was missing some of the features her team needed and she used our APIs alongside our Zapier integration to build her own.
To show off this example, we’ll let Elizabeth tell the story from here. Note that you can see her original version of this post on Medium.
Disclaimer: so I refer to myself as a non-engineer. And I am not one, in the truest sense. But I do work with a bunch of them and have learned enough to get by. I also took some classes in college but have not retained any of it, nor is it even something I’d use (VBA, ha).
I work on the Support team at Gloo. Our Engineering team decided to make the switch to Shortcut (editor’s note: very smart and cool of them). It promised Zendesk integration—great! I didn’t have time to check it out in depth, but my manager told me to trust him, that it was better than our last system’s Zendesk integration.
Fast forward to all our engineers clamoring to use the new tool and wondering when we’d be sending bugs their way from Zendesk. Time to set this up. Should be easy right?
Nope. Wrong.
The integration consists of a Zendesk app. Nothing in Zendesk apps is trigger-able, action-able, filter-able, etc. in Zendesk or Zapier (the two tools I can usually count on to make things do what I want). We would have to manually select to add a card to Shortcut. Manual processes have the potential for human error.
So I checked Zapier. Shortcut has some actions available there (by invite). But no triggers (no bueno) and the only action is to Create a Story. So that was actually worse than our last system’s Zendesk integration.
What to do? APIs and Webhooks!
Zendesk→Shortcut Zap
- Set the Zap’s trigger to be a new Zendesk ticket.
- Add an action using Formatter by Zapier to work with Text to Replace a specified value in a given input.
- In our case, I set the input to be the Zendesk ticket description and have it find quotation marks (") and replace them with \". (Do this if you don’t want errors later! If you have a quotation mark in your Webhook later, it’ll error.) Do this for any text that you’ll be sending into Shortcut that could potentially have a quotation mark in it. I did it for the Zendesk ticket subject and description.
- I added some paths because there are different ticket conditions that would send it to different boards (like if the ticket is an issue on web, it goes to the Web team’s board). Set these up after the formatting actions if you need to send to different Shortcut boards or do something similar.
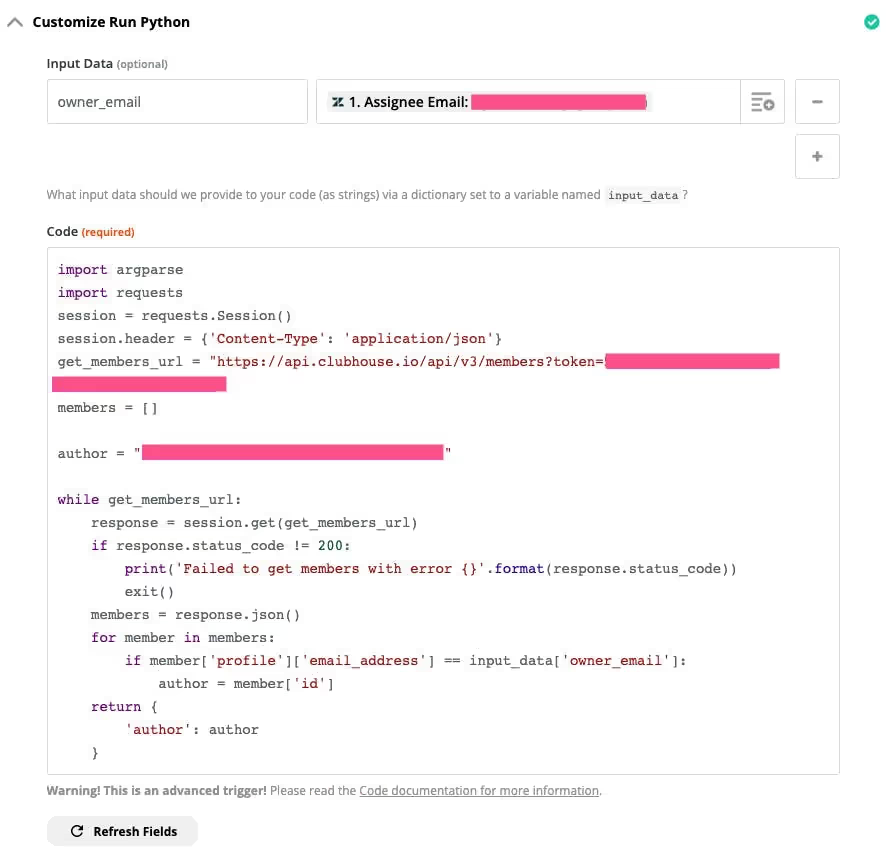
- Add an action using Code by Zapier to Run Python.
- Add one Input Data item called owner_email with the Assignee Email from the Zendesk ticket
- apiThe code will look something like this (please look at the screenshot below though to get the appropriate line indentations! Zapier is very particular about running this with the correct indentations):
import argparse
import requests
session = requests.Session()
session.header = {'Content-Type' : 'application/json'}
get_members_url = "https://api.clubhouse.io/api/v2/members?token=[YourTokenHere]"
members = []
author = "[BackupAuthorIDHere]"
while get_members_url:
response = session.get(get_members_url)
if response.status_code != 200:
print('Failed to get members with error {}'.format(response.status_code))
exit()
members = response.json()
for member in members:
if member['profile']['email_address'] == input_data['owner_email']:
author = member['id']
return {
'author' : author
}
Replace any non-bold text above with your own inputs. (You need to generate a Shortcut API Token.)

Python code to get Shortcut member ID
5. Add an action using Webhooks by Zapier to fire a Custom Request.
- The Method is POST.
- The URL is https://api.clubhouse.io/api/v3/stories?token=[YourTokenHere]
- The Data will look something like this:
{
"description": "Description of the card goes here. I used the Zendesk ticket description from step 1 / trigger.",
"name": "Title of the card goes here. I used the Zendesk ticket subject from step 1 / trigger.",
"project_id": 1234,
"story_type": "bug",
"requested_by_id": "[author output from previous Python step]"
"labels": [
{"name": "label 1"},
{"name": "label 2"},
{"name": "label 3"}
],
"external_id": "[zendeskTicketID]",
"external_tickets": [{
"external_id": "[zendeskTicketID]",
"external_url": "https://[subdomain].zendesk.com/agent/tickets/[zendeskTicketID]"
}]
}
Replace any non-bold text above with your own inputs. Or check out Shortcut’s Create Story API documentation for available parameters and make a custom request to fit your needs. To get the Project ID, I recommend a quick GET request using the List Projects API endpoint.
- The Headers are Content-Type | application/json
6. Continue on through and test the Zap.
7. Add an action using Zendesk to Update a Ticket. Use the ticket ID from the Trigger step in the Zap and have it post a private note to say the card was added and include a link to the card.
Shortcut→Zendesk Zap
1. Set the Zap’s trigger using Webhooks by Zapier and a Catch Hook trigger.
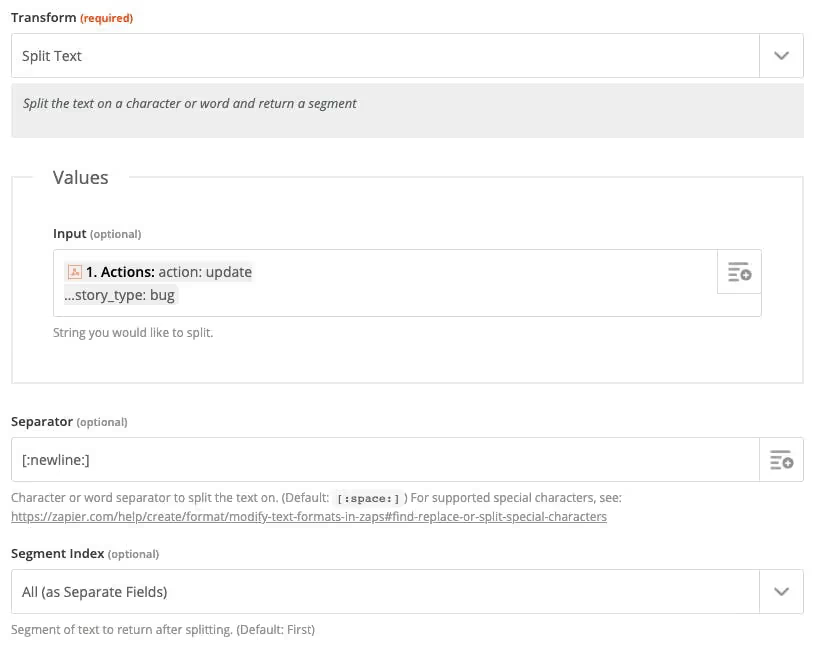
2. Add an action using Formatter by Zapier to work with Text to Split Text to separate the Actions data from the Webhook to new lines using [:newline:] with the Segment Index of All (as Separate Fields).

3. Add a Filter step to only continue if the Actions data does not contain the string story-task.
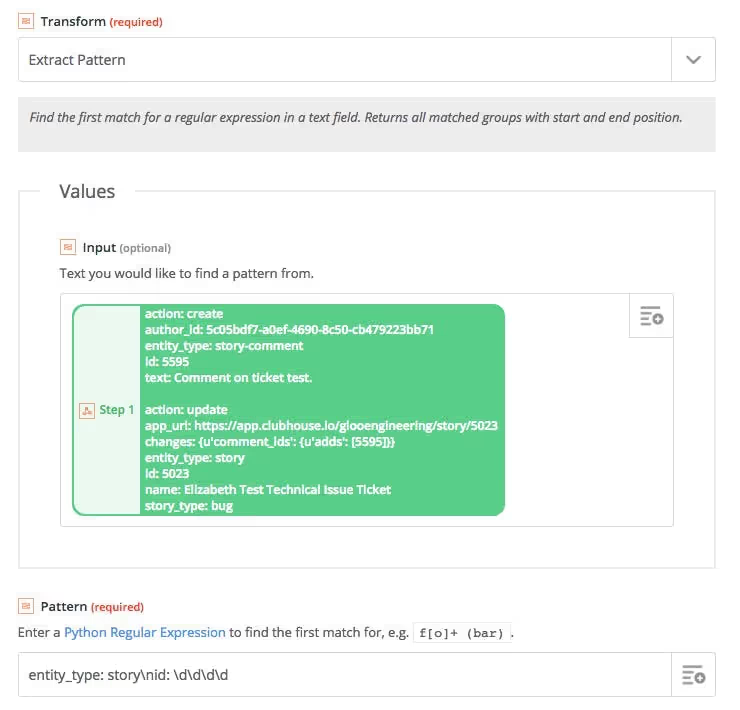
4. Add an action using Formatter by Zapier to work with Text to Extract Pattern in a specified value in a given input.

5. Add aFilterstep to only continue if Outputfrom the previous step Exists.

6. I set up different paths based on the type of update (Lane Changes, Comments, and Archived/Deleted) but for my own sanity, will only explain how I set up Comments. But if you want to do it similar to how I did, add your paths now.
7. Set up a filter (or path rule) to only continue if the Catch Hook “Actions” portion of the response contains entity_type: story-comment and the “Actions” does not contain action: delete

Setting up Catch Hook rules in Zapier
8. Add an action using Webhooks by Zapier to fire a Custom Request.
- The method is GET.
- The URL is https://api.clubhouse.io/api/v3/stories/[storyID]?token=[YourTokenHere]. Fill in the storyID from the previous Extract Pattern step (6) above.
- The Headers are Content-Type | application/json
9. Add a Filter step to only continue if Output from the previous step Exists.

For an Archive/Delete path, you should omit steps 10/11 as it will error (there’s no card to get). And in the steps following, you would use the story ID rather than the external ID. (You could technically omit steps 10/11 for all paths, but the external ID is a more reliable source of the ID of the ticket to update.) Also for the Archive/Delete path, make sure to filter if the “Actions” portion of the response does not contain story-comment. Comment deletions would otherwise cause a false positive for a Story being deleted.
10. Add an action using Zendesk to Find a Ticket. For the Query, use the External ID item from the Custom Request in step 8.
For an Archive/Delete path, you would use the Query “https://app.clubhouse.io/[ShortcutProject]/story/[storyID]”or, if you have a custom field to capture the URL (see step 6 in Zendesk→Shortcut above) then you should use the Query fieldvalue:“https://app.clubhouse.io/[ShortcutProject]/story/[storyID]”
11. Add a Filter step to only continue if ID of the ticket from the previous step Exists and the Status of our ticket from the previous step Does not exactly match Closed

12. Add an action using Webhooks by Zapier to fire a Custom Request.
- The method is GET.
- The URL is https://api.clubhouse.io/api/v3/members/[memberID]?token=[YourTokenHere]. Fill in the memberID using the Catch Hook “Member ID” portion of the response.
- The Headers are Content-Type | application/json
This gets the profile information for the commenter.
13. Add an action using Webhooks by Zapier to fire a Custom Request.
- The method is GET.
- The URL is https://api.clubhouse.io/api/v3/stories/[storyID]/comments/[commentID]?token=[YourTokenHere]. Fill in the storyID using the output from step 3. Fill in the commentID using the Catch Hook “Primary ID” portion of the response.
- The Headers are Content-Type | application/json
This gets the comment information.

Have it post a private note that says something like this:
[commenterName] commented on Shortcut card [storyID]: [commentText]
Fill in the commenterName using the Custom Request in step 12 “Profile Name” portion of the response.
Fill in the storyID using the output from step 3.
Fill in the commentText using the Custom Request in step 13 “Text” portion of the response.
If you made it to this point, kudos to you. What I explained above is a pretty specific use-case, but it’s meant to show you that with awesome APIs and a little webhook magic, you can do a whole lot.
Maybe you want to have comments on Shortcut cards post directly to a Slack channel. Easy! Take the Shortcut→Zendesk steps and omit step 5–7 and change step 11 to post to a Slack channel instead of updating a ticket.
Once you get one thing set up, you’ll realize all the data you have to work with and will want to keep going. Especially in Shortcut’s case, with so many APIs available, you can GET and POST until you’re blue in the face.


.png)


